For those that love birds, a DIY bird feeder is the perfect project that will attract all kinds of birds to their garden or balcony! Read on for some easy, cheap and fun ideas.
Temperatures are starting to dip, and the birds flitting about in search of food in the winter would definitely be grateful for any help they can get. Helping them is as easy as buying some birdseed, using recyclable items around your house, and splashing on a little paint!
These DIY bird feeders are cheap, easy to make, and don't even need too much time! Painting your projects in bright colours will help attract birds and look ever-so-pretty hanging in your balcony or from a tree in your garden. The added bonus of getting to watch birds flock to your home works as a fun incentive to pick up a DIY bird feeder as a project this December!
Plastic Bottle Feeder
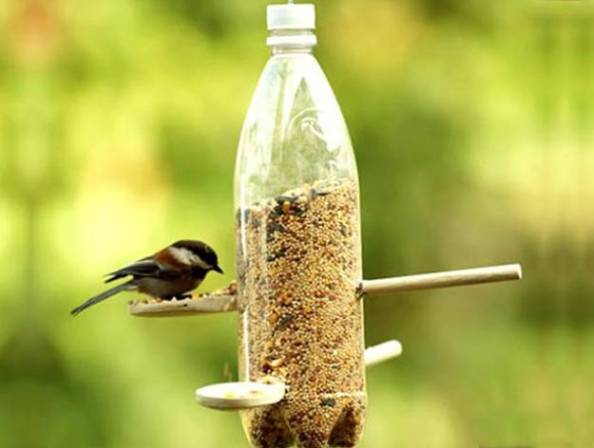
Plastic bottle feeders use plastic soda or water bottles that might otherwise have been trash. Recycling items around the house is a great way to create something new and functional. For this project, the items you need are:
- Plastic bottle (keep the lid)
- Old (or very cheap) wooden spoons
- Rope
- Bird seed
- Scissors/ knife/ box cutter
- Paint & paint brushes (optional)
To make this feeder, you can use either one or two wooden spoons with handles long enough to go through the bottle. It should stick out from both ends so that one side becomes a ledge for the birds to sit on, while the other becomes a surface for bird seed to fall out. Here are the steps!
Step one - Make two holes on opposite ends of the bottle towards the middle or just below the middle of the bottle. Make sure these holes are NOT level, they should be slanting to encourage the seeds to fall onto the spoon. Make four holes if you'd like to fit two wooden spoons for multiple birds.
Step two - Fit your spoon to ensure it fits, with the lower hole being where the bowl of the spoon is. If you'd like to paint the bottle, take the spoon back out and prep your space for painting.
Step three - Paint your bottle with bright beautiful colours, in any design (this part is optional). And wrap the thread around the neck of the bottle with long ends free for tying the bottle up.
Step four - Fit the wooden spoon(s) back into place and make sure the lower hole, where the bowl of the spoon sits is large enough for the bird seed to trickle out.
Step five - Find the perfect spot near a window to tie up your cool new bird feeder!
Pinecone Bird Feeder
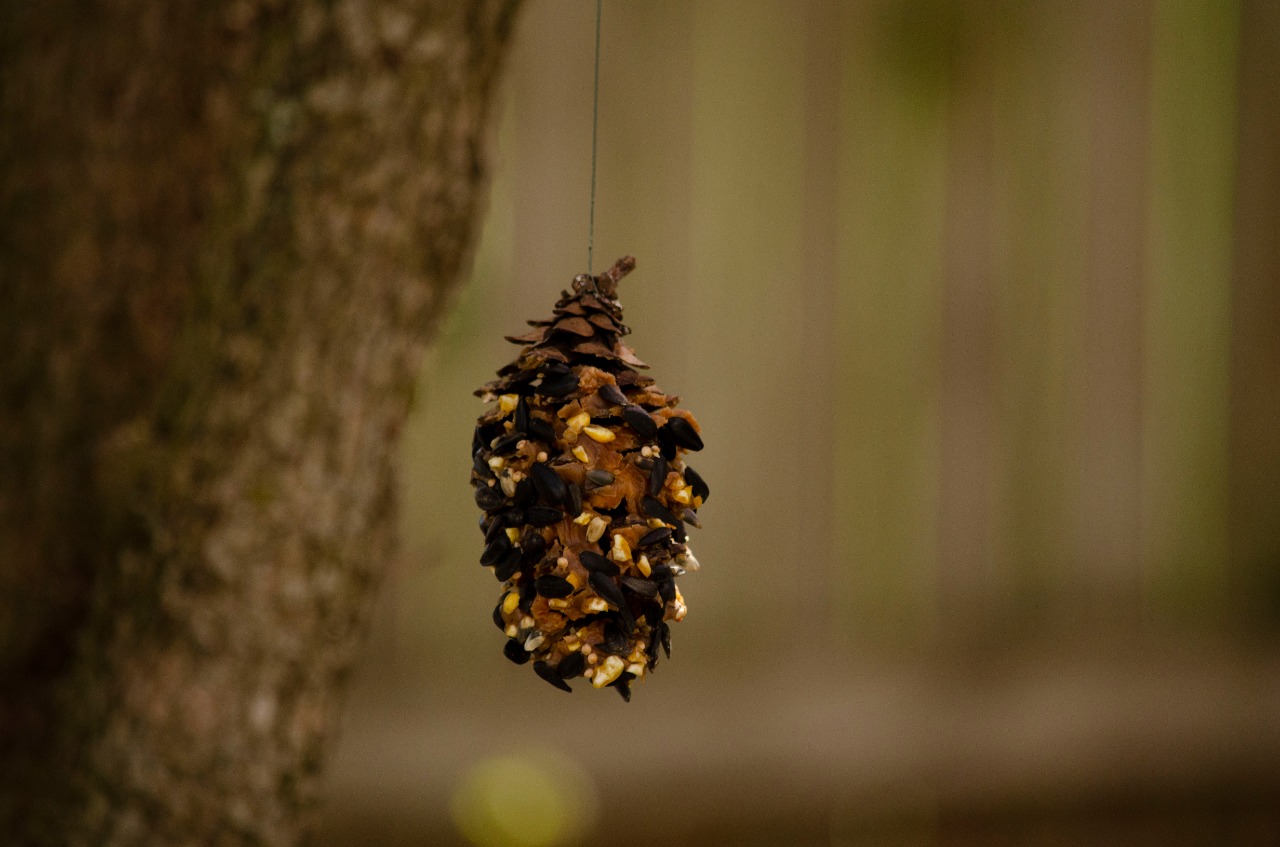
This one is one of the easiest ones to make and they look quite pretty when finished. Pinecone feeders are perfect if you want to make multiple feeders to decorate a tree in your yard or to tie to a long window for multiple birds to come visit. All you need to make these feeders are:
- Multiple pinecones (can be bought cheaply from a decoration store)
- String
- Peanut butter
- Birdseed
A fun way to make this whole project more creative and colourful is to pain the bottoms and tops of the pinecones in bright colours before hanging. These feeders also give a very festive look when hung up like this. If you're eager to get started, here are the steps!
Step one - Grab your pinecones and strategically spread a little peanut butter in the crevices.
Step two - Pour some bird seed into a bowl.
Step three - Roll the pinecones with the peanut butter in the birdseed, add more peanut butter to help the seed stick well.
Step four - Wrap the string around the pinecone stalk or middle.
Step five - Hang them up!
Cookie Cutter Bird Feeders
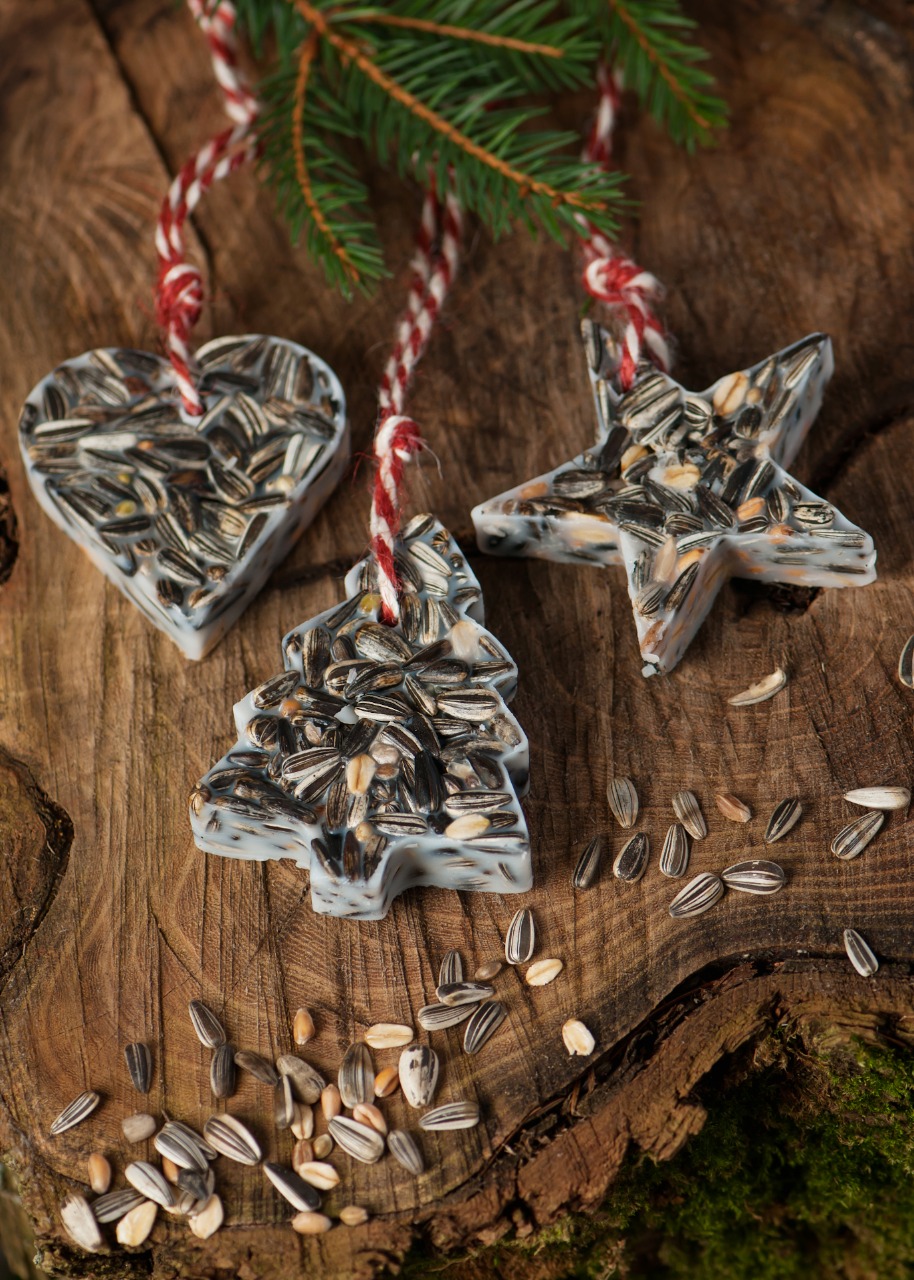
This one is a fun, slightly messy project that is sure to be a huge hit with kids. You can make these in all kinds of fun shapes. They make cute DIY christmas ornaments, you can also pack them up for a friend who loves gardening and birds, or you can hang these up yourself around your house or in your balcony and then see who shows up for a meal! There are three different bases you could make this out of. The bases you can choose from include:
Base No. 1 - Coconut oil
Base No. 2 - Peanut butter with thick, hard flatbread
Base No. 3 - gelatine powder (2 1/2 tsp), flour (3/4th cup), water (1/2), and corn syrup (3 tbsp)
To make one of these adorable bird feeders follow the steps below:
Step one - Pick out your base and the cookie cutter you want to work with. Festive shapes are perfect if you plan to give them as gifts or hang them for Christmas. Shapes like stars are classics that work for every type of festival!
Step two - For the peanut butter and thick hard bread, we recommend that you cut the bread into desired shapes along with a hole in the middle for the string before spreading peanut butter on it and dipping in a bowl of bird seed.
For the gelatine base feeders, add the flour to the birdseed and mix. Then add water, gelatine powder and corn syrup and stir till the water is boiling and the mixture is sticky.
Step three - Add the liquid ingredients to the dry ones and press the mixtures (if using coconut oil or gelatine bases) into the cookie cutters and refrigerate to set.
Step four - Once set, unmould and keep in the freezer. Only take out as many as you need before you decide to hang them up.
Notes:
- Coconut oil will melt above 22 degrees and is only recommended for cold areas.
- The gelatine base has the shelf life of a few days, so you should make several extras to keep in your freezer for switching out the old ones with.
- Use brightly coloured string or ribbon to make your feeder look more attractive.
- Be sure to rub the cookie cutters with oil to make the moulds easy to remove.
Try making one of these bird feeders for a fun craft project that adds a bit of function and makes your home just a little more beautiful. Let us know what worked and what didn't in the comments below!